In the last article we learned about git stage, commit, stash, reset and remove now we will move to some other commands to give this series a proper ending for basic idea and to get starting.
Going back a commit
This is essentially destroying history. So be cautious of this one.
- If we want a to go back to one commit behind or we want to delete a commit
-
git reset --hard HEAD~1 - To revert to a specfic commit
-
git reset commit_id-git revert commit_id - Then if we want to push that to remote (origin)
-
git push -f origin main
checking a previous commit
- If we want to go back and just check a commit then
-
git checkout commit_idWe cannot work while in this checkout mode - After checking that commit and want to comeback to present
-
git checkout master
Rebase
Merge and rebase works in same way but with slight variation. Merge squashes all the commit and puts it as one commit in the branch. On the other hand rebase takes those commits and puts infront of the branch. Image below describes it well.
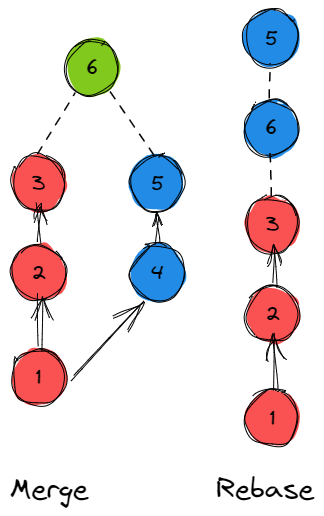
It helps to maintain a clear commit history rather than a messy one. But each has its own merits depending on circumstances.
- We can rebase branches by using
-
git rebase dev-git rebase master - After solving conflict
-
git rebase --continue - To abort a rebase
-
git rebase --abort
More on rebase here
Branching
Branching is literally what we see in a tree. From the main body, it branches out, holding the same properties as the tree, but it may contain modifications or it may just help test new features without tampering with the main base.
- To check branch number
-
git branch(star mark indicates the current brunch I’m working in) - To creat a branch
-
git branch branchName - To switch to a different branch
-
git checkout branchName-git switch branchName - After creating a branch suppose we add a file to that branch and stage + commit it. If we now switch it to the master we won’t see the file in file manager.
-
git branch dev-git checkout dev- create a file through file manager or add any file -git add .-git commit -m "added"-git checkout master - Making branch from a specific commit
-
git branch branch_name commit_id
Merging
Lets say there is two branches. One is master and other one is dev. Master branch has two files. one.txt and two.txt . Dev branch has same file as it was branched from master. We are in dev branch and add a file named three.txt and we stage and commit it. After that we switch to master and add 2 in two.txt and commit it. Now again we switch to dev. and we will merge master and dev to together in dev. Command will be
- git merge master -m "message"
As we added 2 in two.txt now dev branch will have that two in two.txt .
We will now switch to master and merge dev into master.
- git checkout dev
- git merge dev -m "message"
The file from three.txt now will come to master bringing both the branch to upto date with eachother.
merge with conflict
When same file and same line is changed from two side while merging it will create conflict. Conflict should be removed manually by checking the places.
- To abort a merge
-
git merge --abort
Push, fetch and pull
To understand in simple terms

Push helps to push the local repo to the remote repo. It is a good practice to do pull before pushing.
Fetch will note the change and it will reflect on local repo but to see those file in file manager or working directory we will need pull. Pull will bring the back the change from remote to working director. Now the commands
git push
- git push origin master
- git push origin dev
git fetch
- To bring the changes.
-
git fetch - If we want to reflect those on working directory then
-
git merge
git pull
git pullIt will do fetch and merge together and directly reflect the change in working directory.
Learn more
These were some of the commands that are very important for a beginner to learn. After this there are much more commands and flags to learn. To dive deep check out the git documentation.